How to install the viiaPackage
This how-to guide will explain how to install the viiaPackage, prepare DIANA and prepare the working directory. It will also describe how to install the required modules for the viiaPackage (including the fem-client).
There are two ways python scripts are used in VIIA:
Run scripts in PyCharm to create and manipulate the fem-model of the object and create deliverables.
Run scripts in DIANA to create the model in DIANA, prepare and run analyses and handle the results.
This means that the viiaPackage needs to be installed (and updated) in two different locations. Firstly, in the virtual environment created for your VIIA object. Secondly, in the Python environment that is used by DIANA. For the server installation the same procedure shall be followed, using the same file to create the virtual environment remotely and a different file to setup or update DIANA. The following procedure is available for the engineer to assist in the installation process.
Setup viiaPackage in workfolder (to setup the workfolder).
Update package for workfolder (to update the workfolder).
Setup viiaPackage in DIANA (to setup and update the DIANA software).
Setup viiaPackage in workfolder
Before starting make sure Python 3 (version≥3.10) and PyCharm are installed on your system. Then, if you have never done so, navigate to https://corporateroot.visualstudio.com/ and fill in your personal data in the screen that is shown. This action only needs to be performed once. Please check if you have access to the VIIA project on Azure Devops. If not, please ask Reinier Ringers. to grant you access.
Next, create a new empty folder for your VIIA object. For instance in Documents/VIIA/940M, in which the last number is your object code.
To aid the user, an installation script is provided that does the following:
Look for python installations on the system
Prepare a virtual environment
Install viiaPackage
Install dependencies of viiaPackage
The installation script can be downloaded here:
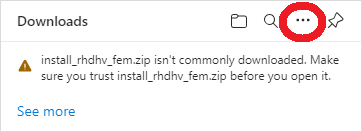
Most likely, Windows will not automatically download the file when clicking on the link, but a pop-up will be shown. In there you should click on the three dots and then click on ‘keep’.
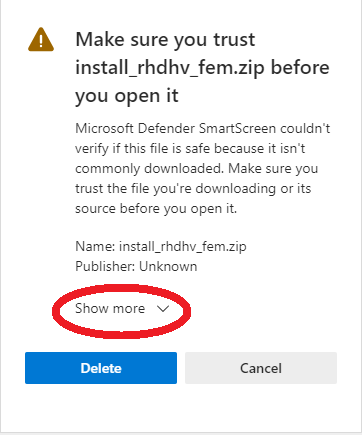
Another window will show up, there you should click on ‘show more’.
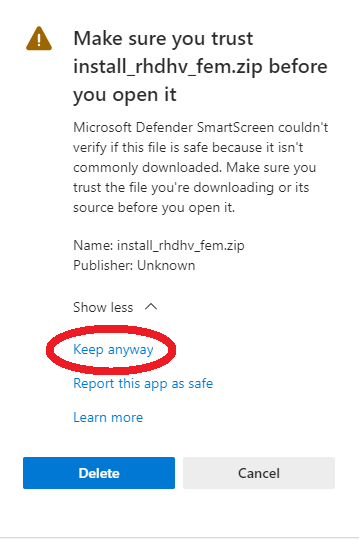
And finally you should click on ‘keep anyway’, to download the file.
Put the batch script for starting a new object in a new empty folder for your VIIA object, the script can be downloaded as explained above. Make sure you have completed the login-procedure on visual studio as described above before continuing.
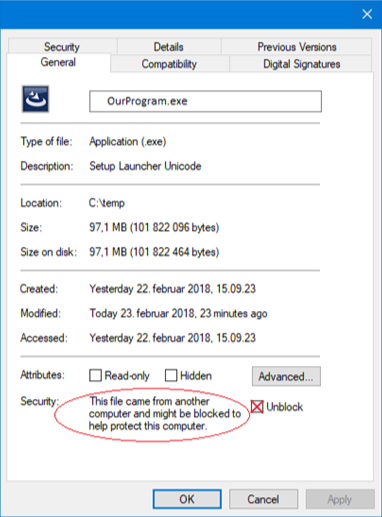
For the server installation (additional step, ignore for the local installation), right click on the batch file and choose properties, and tick the ‘Unblock’ box under Security:
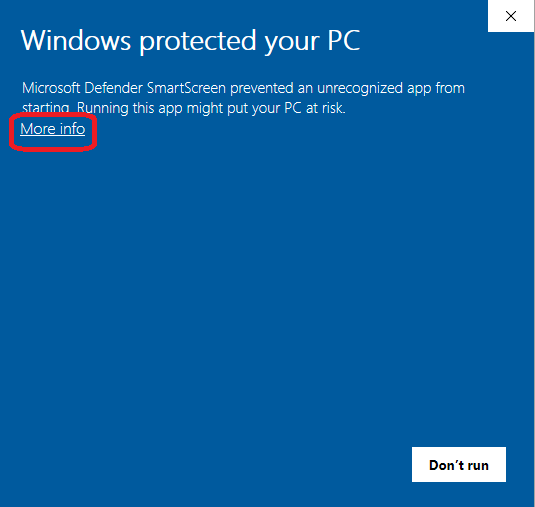
Now run the batch script by double clicking on it. A pop-up will be shown where you have to click on ‘More info’.
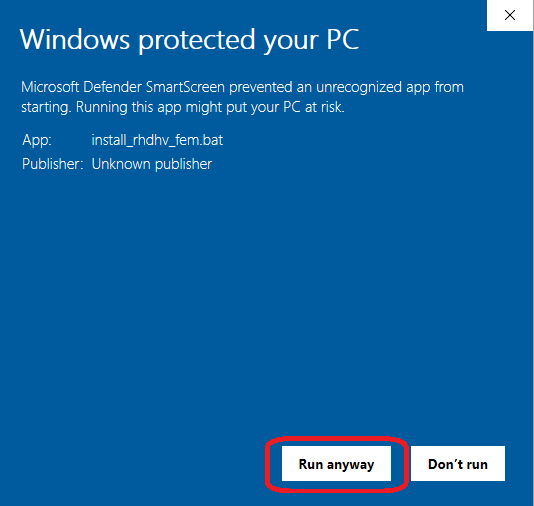
Then it is possible to click ‘run anyway’.
A command window will open, in which you will be able to track the installation steps. If python interpreter(s) are found by the script it will ask if you want to use one of them to create the virtual environment. If no interpreters are found or if you don’t want to use them, you can specify a path to a python interpreter.
When a valid Python interpreter is selected a virtual environment will be created named venv. Afterwards it will try to install the viiaPackage through pip. Because the viiaPackage is hosted in a private repository, authentication needs to be performed in order to access it. In the command window, you will be prompted for this authentication procedure, as can be seen below:
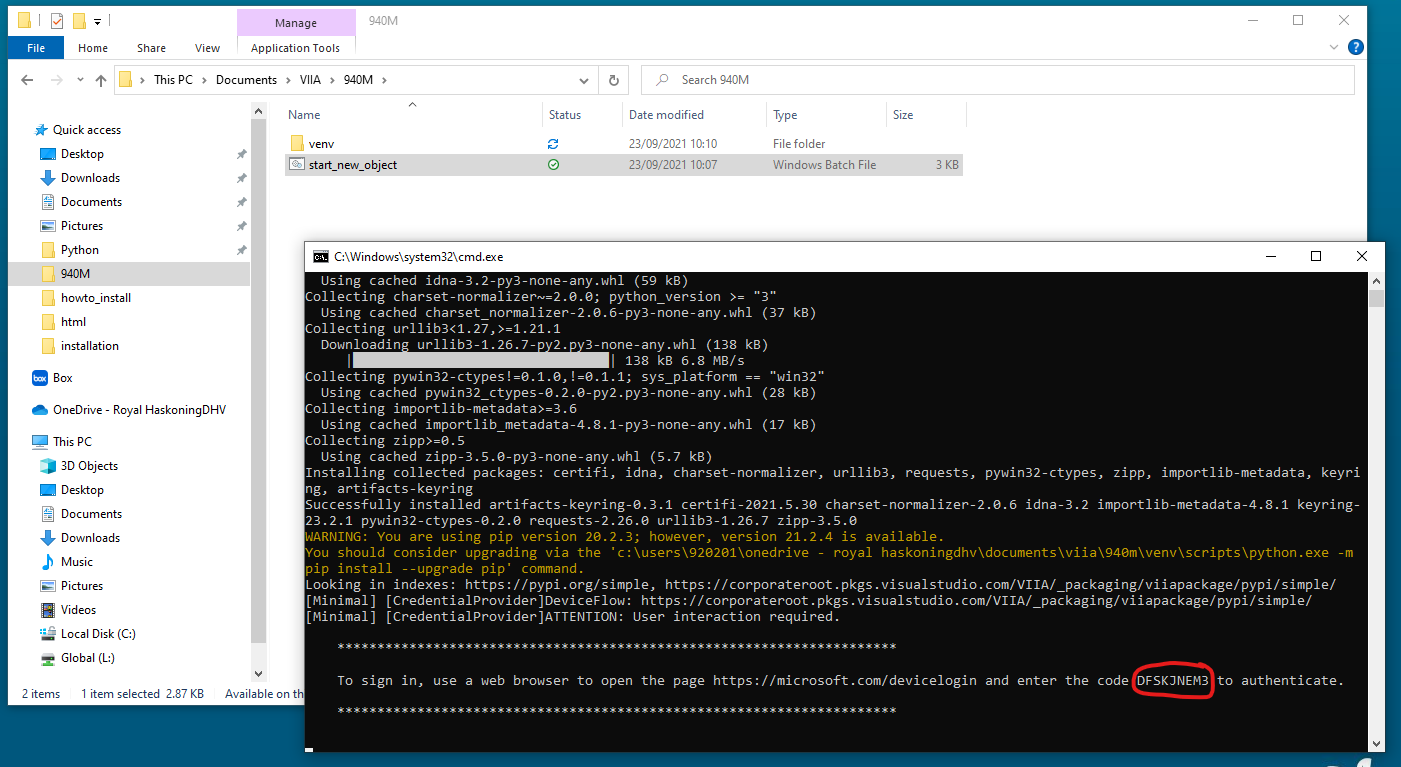
Navigate to https://microsoft.com/devicelogin and enter the code that you see in the red circle above. Follow the steps on the screen to login and return to the command window. The viiaPackage will now be installed along with it’s dependencies, for example the haskoning_structural package.
Warning
Note that there is a time limit for the device login check, you require to provide within 90 seconds.
Now that the viiaPackage is installed in your virtual environment, the start tool is executed. This start tool is created to assist the structural engineer in preparing the workfolder for their object.
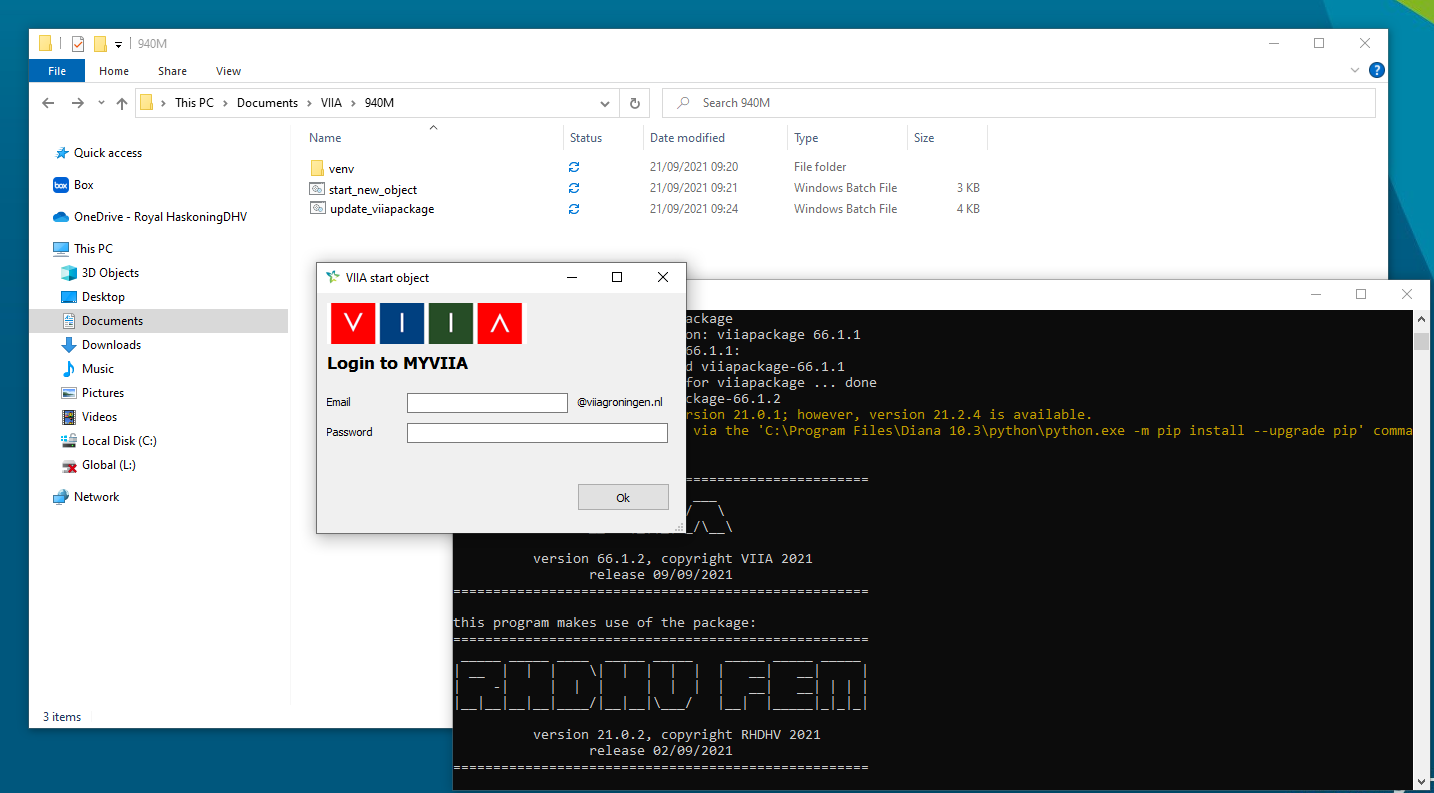
Log in using the credentials for the MYVIIA environment. If you don’t have credentials for MYVIIA yet, you can request by sending an email to datatool MYVIIA (Reinier Ringers). When you login is successful, a dropdown menu will show that contains the objects that are assigned to you. It’s also possible to select an object from the list of all objects in the database. It might be that the planning is not updated yet and that you need to select the object from that list.

When you select an object from the list, the relevant files will be prepared in your workfolder. The template scripts that are available in the viiaPackage are copied to this folder, and a user_config file will be created for you. Next step is to open the file as a PyCharm project, so you can start working on your object. Right click in the workfolder, you should see the option to open it in PyCharm like below:
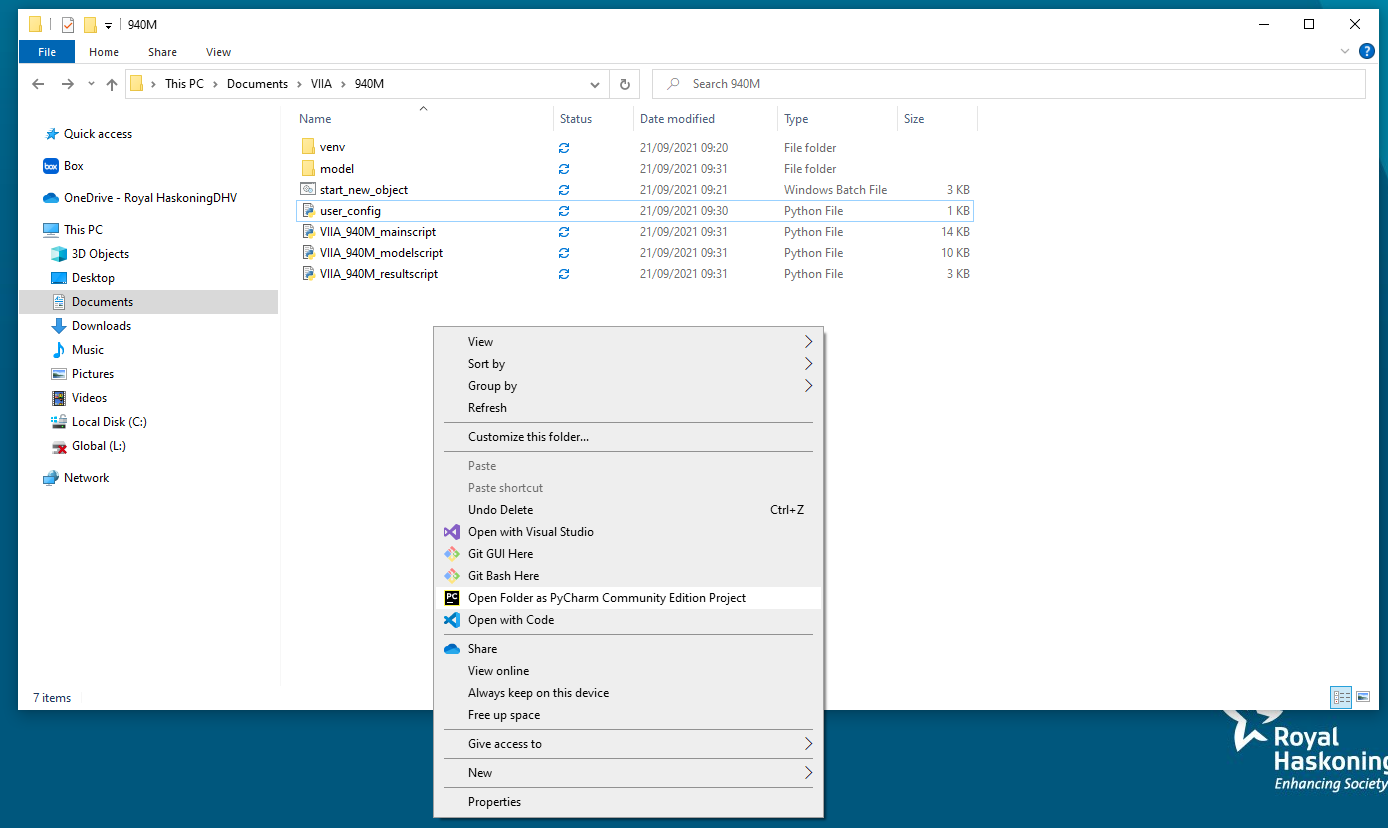
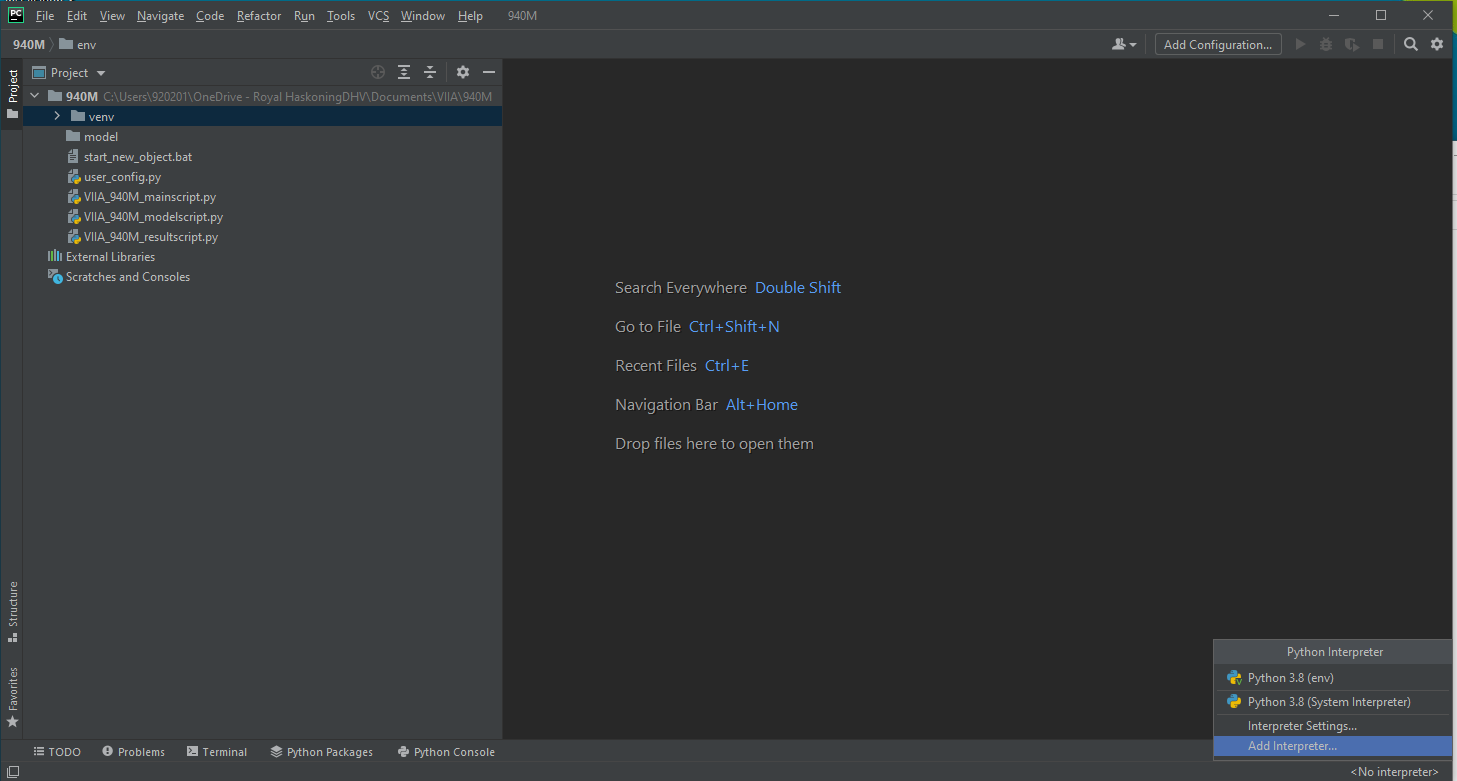
If that option is not present, launch PyCharm normally and go to File -> Open, then select the workfolder for your object in that way. Next thing to do is to tell PyCharm which python environment to use to run the scripts. On the bottom right corner of the screen, you will likely see <no interpreter>. Click here and select ‘add interpreter’ from the list.
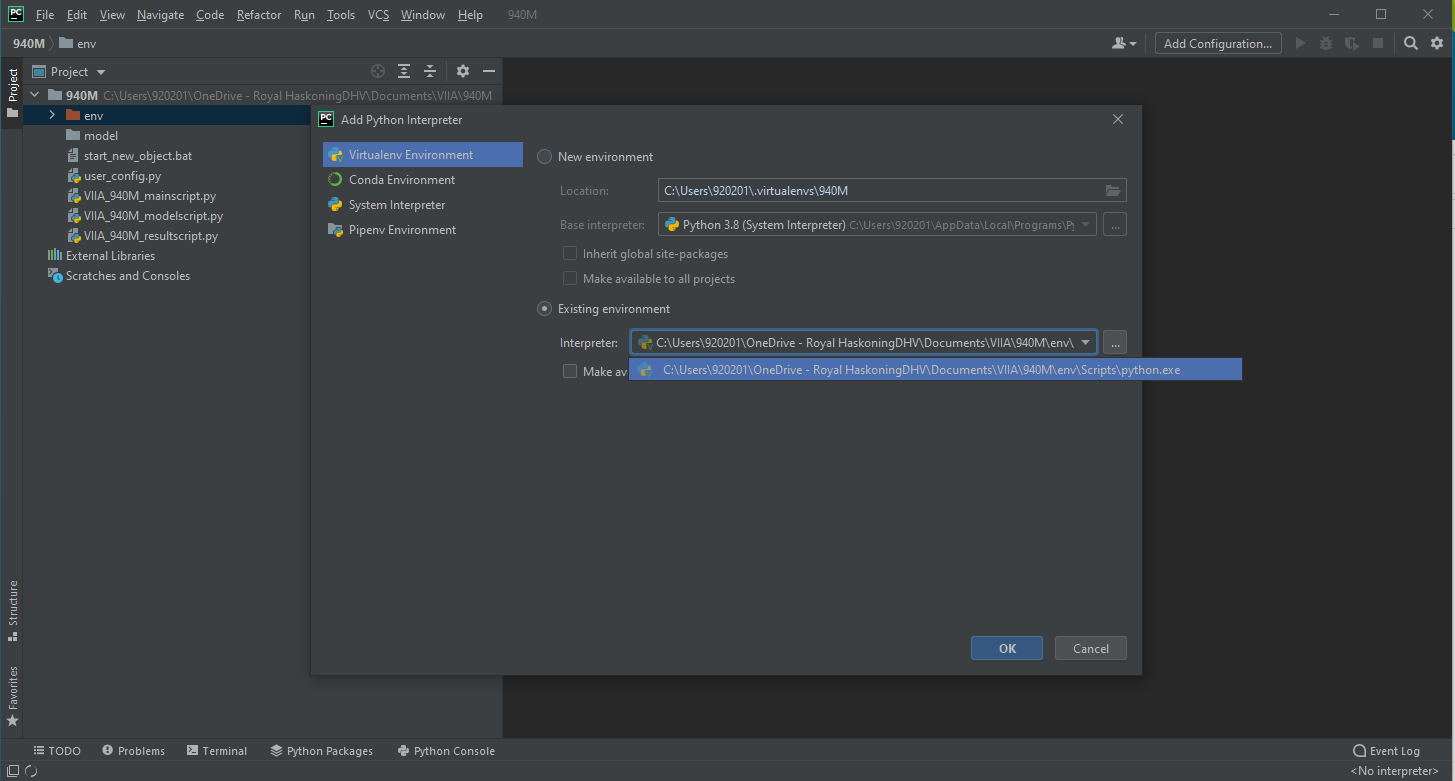
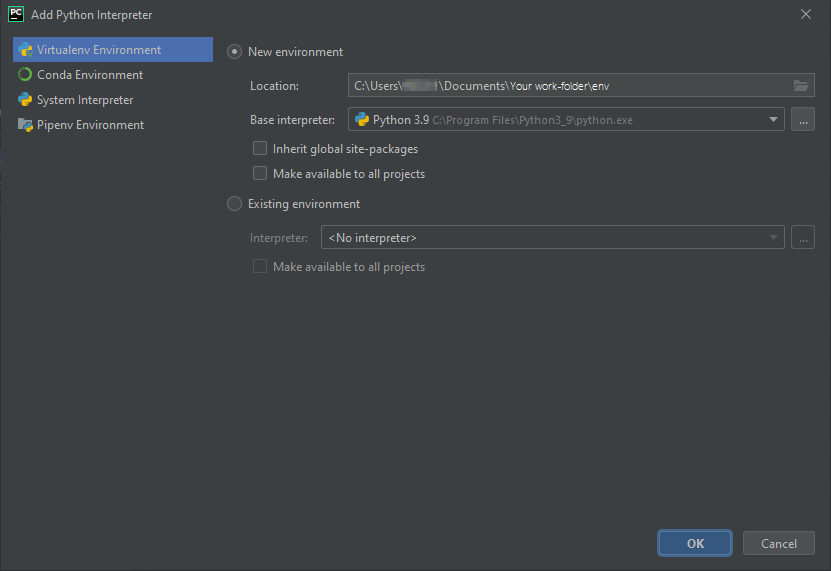
In the next screen, select existing environment. Now navigate to the python.exe file that is present in env/scripts/python.exe in your workfolder and select it. Pycharm will now use this environment, that has the required packages installed, to run the scripts in this folder. You can test if it works by simply running one of the files.
Setup viiaPackage in DIANA
Note
It is recommend to first setup the workfolder, see Setup viiaPackage in workfolder. How to deal with accounts and batch-files is only explained in that section.
To facilitate the installation of the viiaPackage in DIANA on your local machine a batch file is available:
For the servers, the latest version of the viiaPackage is installed automatically, both in Diana and as a venv. To use the automatically updated venv use this interpreter:
>>> "E:\VIIA\server_venv\Scripts\python.exe"
See Set interpreter in PyCharm how to use the venv in PyCharm.
If you need another viiaPackage version in Diana, this version of the batch file can be used:
Setup diana script on the server
Warning
Once you use this script above, the automatic updating of the viiaPackage will not work for you anymore. It is advised to remove the manual viiaPackage version once you finished your object.
For the server installation (additional step, ignore for the local installation), right click on the batch file and choose properties, and tick the ‘Unblock’ box under Security:
To set up the environment for DIANA locally, right-click on setup_diana.bat and click on Run as administrator. For the server version double click the setup_diana_server.bat to Run it. The batch file will ask if a specific version should be installed/updated and subsequently checks if DIANA is installed in the expected folder and ask to install or update the viiaPackage.
Final step is to set up DIANA. Make sure you set the default projects directory to your workfolder, in this case 940M. The procedure to set up DIANA can be found here: How to set-up DIANA.
Update package for workfolder
When a new version is released (you will receive an email for larger updates), you should update your viiaPackage version. New versions include bug fixes and new functionality. In the email it is mentioned if the updates require updates in your scripts. Smaller updates (patches) are released more often, they don’t require changes in your scripts. There are two ways to update the package of the venv, with a batch-script or with a method of project.
batch-script
The batch-script can be downloaded here:
Make sure you copy this script to the workfolder in which you would like to update the viiaPackage. The script looks for a virtual environment with the name venv, but it is also possible to select a custom environment if venv is not found.
When the script is executed, it will prompt the user for a version of the viiaPackage. This makes it possible to also downgrade your package to a lower version. If you would like to install the latest version, simply press enter to continue. This will collect the latest version from Azure DevOps, using the artifacts-keyring package for authentication. If you have used this way of authentication before, it will likely not be necessary to login again. If not, simply follow the procedure to obtain a token as described in the command window.
Warning
Diana should be updated separately, see Update package for DIANA.
update_package method
In your model or mainscript you can use the update_package() method of the
project (available from viiaPackage version >= 68.9.4). For updating to the latest version of the viiaPackage the next
line can be used:
>>> project.update_package()
To switch to a specific version the next line can be used:
>>> project.update_package(version='68.9.4')
Note
The venv will use the updated package after the current run of the script is finished. Hence, you will need to re-run the script.
Warning
DIANA should be updated separately, see Update package for DIANA.
Update package for DIANA
For updating DIANA the same batch-file can be used as for the initial installation.
Uninstall packages from DIANA
In some cases it may be desired to uninstall all the packages from python interpreter in DIANA. To do this, a script can be downloaded from the link below and should run as administrator:
This script uninstalls all the pip installed packages. To remove specific packages see Manually setup DIANA.
Manual setup workfolder
When you encountered any problem in the automatic setup, follow (parts of) the manual instructions in this section.
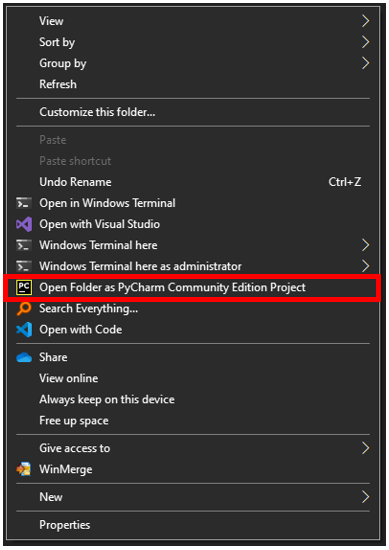
To set up a PyCharm environment right-click in your working folder without any file selected. In the context menu, you should see ‘Open Folder as PyCharm … Project’. Click on that.
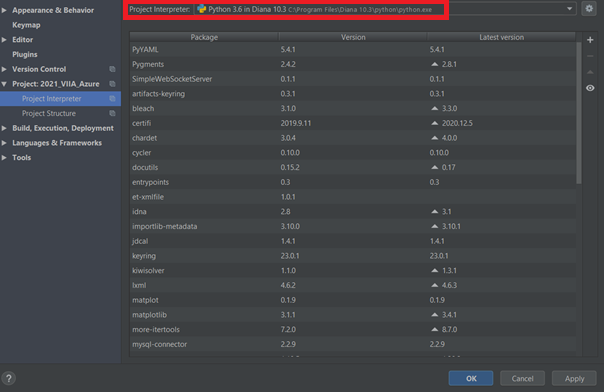
If that is not present, launch PyCharm normally and Go to File -> Open, then Navigate to your working directory. Then go to File -> Settings and Navigate to Python Interpreter on the left pane.
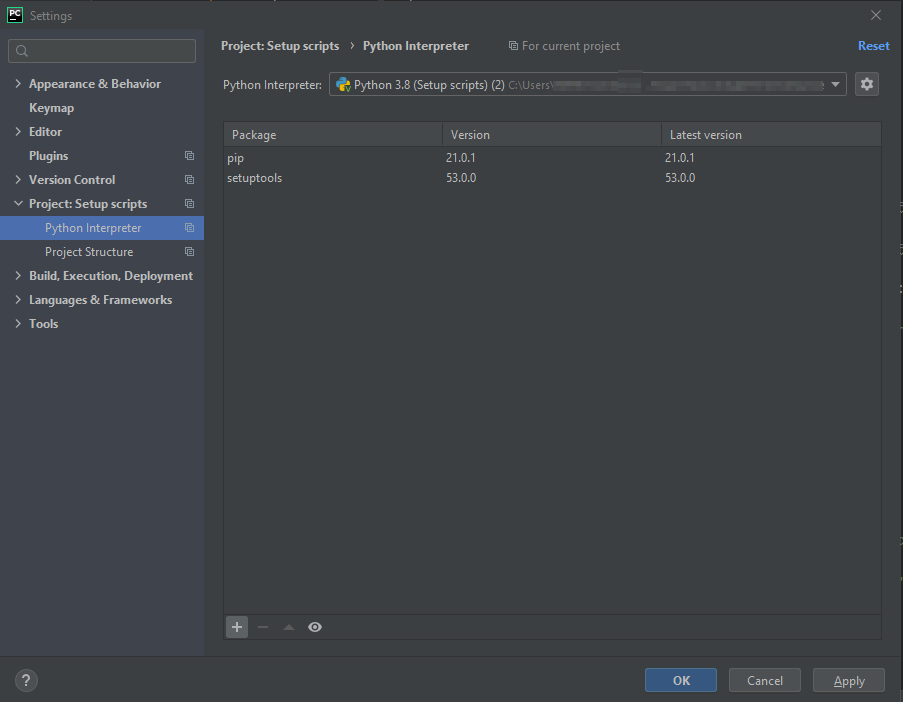
Select from the dropdown the python interpreter you would like to use. It is good practice to create a clean virtual environment each time you start a new object:
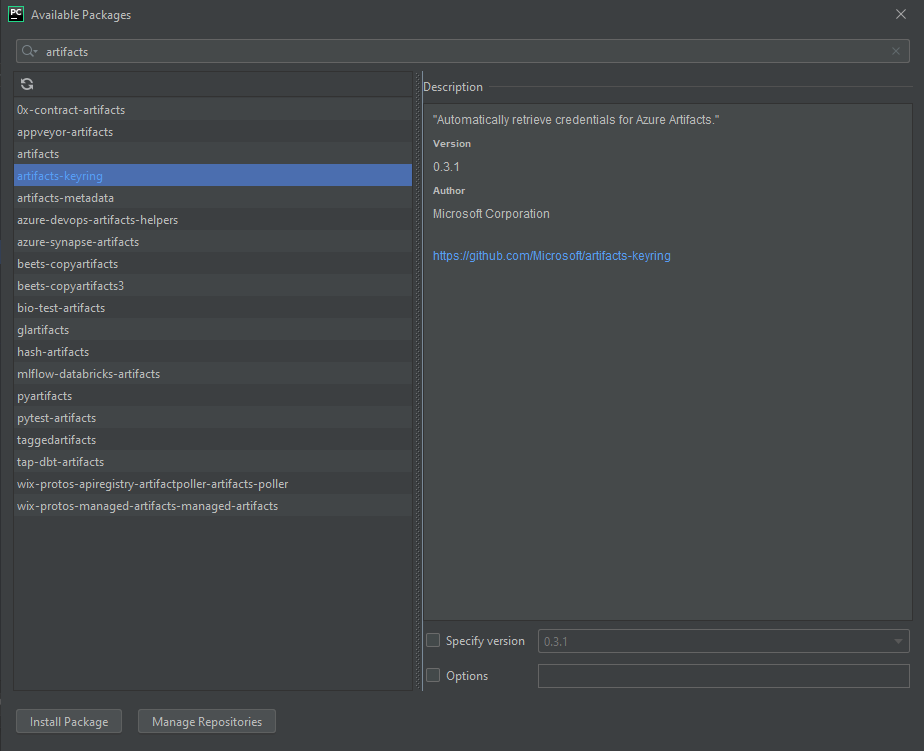
Click the plus sign above the list of installed packages to open the install window. Install artifacts-keyring package:
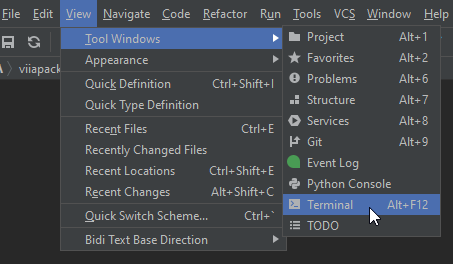
Next open the terminal in PyCharm.
Make sure that you are in the correct workfolder and that the newly created virtual environment is activated. When it is activated, (venv) will be written in front of the command line:
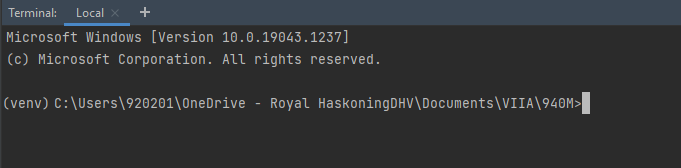
If this is not the case, use the command call venv/scripts/activate. This will activate the environment. Now type in the commands to pip-install the viiaPackage and click enter:
>>> pip install viiapackage --extra-index-url=https://corporateroot.pkgs.visualstudio.com/VIIA/_packaging/viiapackage@Release/pypi/simple/ --extra-index-url=https://corporateroot.pkgs.visualstudio.com/_packaging/haskoning-py/pypi/simple/
This will install the viiaPackage in your virtual environment, along with its dependencies such as haskoning_structural.
Note
In some cases it may be necessary to prepend the above command by python -m, if the python environment is not correctly added to path. (python -m pip install ….).
If a specific version of the viiaPackage the version number can be added in the usual way.
>>> pip install viiapackage==68.9.1 --extra-index-url=https://corporateroot.pkgs.visualstudio.com/VIIA/_packaging/viiapackage@Release/pypi/simple/ --extra-index-url=https://corporateroot.pkgs.visualstudio.com/_packaging/haskoning-py/pypi/simple/
If you still encounter problems, your technical master is happy to assist you.
Manually setup DIANA
You can install additional packages in the python interpreter of DIANA in two ways.
If you select the python interpreter of DIANA in pycharm you can install most pip packages in pycharm as described in Manual setup workfolder.
Note
Administrator access should be activated before you can use PyCharm to update DIANA.
It is also possible to install modules with the command console. To do this, make sure you open a command prompt in administrator mode. This is required because the python installation of Diana is located in the Program Files of your pc. To edit files in the Program Files, administrator privileges are required.
Warning
To run commands in the python interpreter of Diana, a command prompt with administrator privileges is required.
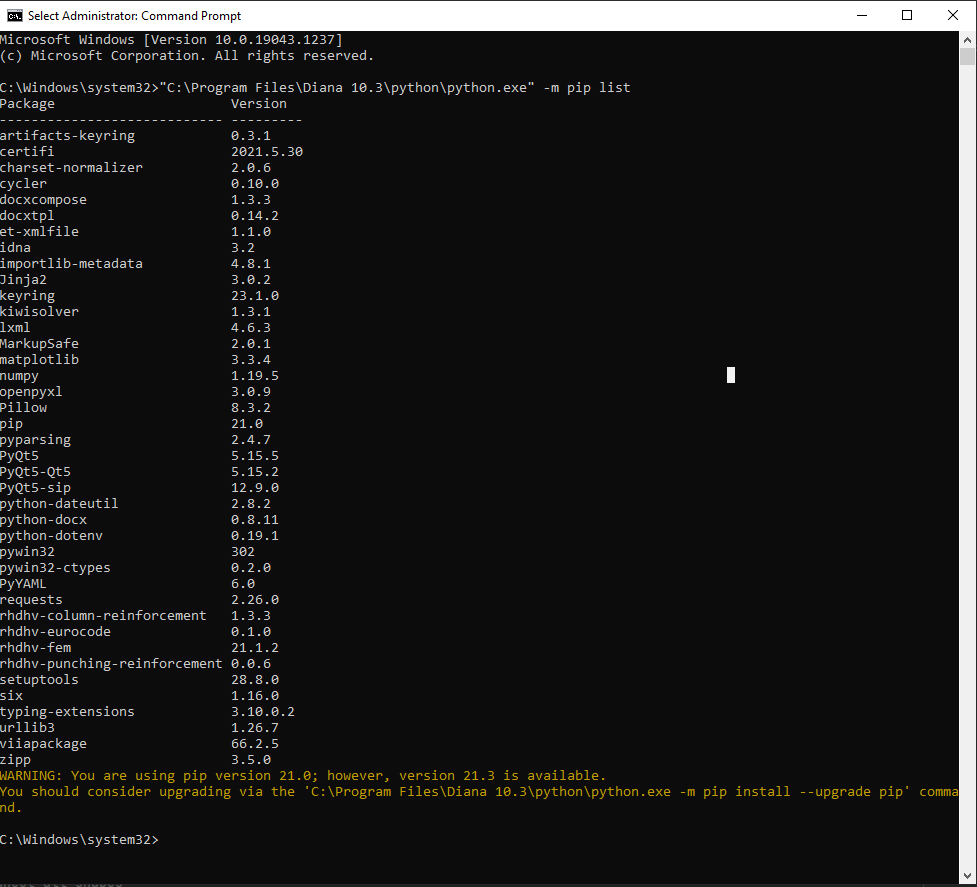
To run python commands for the DIANA interpreter, you have to specify the location of the interpreter along with the command. For this, you have to know where your DIANA interpreter is located. For DIANA 11.0, the default location is “C:\Program Files\Diana 11.0\python\python.exe” (Make sure to include the quotation marks because there are spaces in the path). With this location it is possible to run commands using this python interpreter, including pip commands for installation of packages. Below it is demonstrated how to show the installed modules in DIANA:
>>> "C:\Program Files\Diana 11.0\python\python.exe" -m pip list
Warning
Before the viiapackage can be installed the artifacts-keyring package should be installed.
>>> "C:\Program Files\Diana 11.0\python\python.exe" -m pip install --upgrade artifacts-keyring --disable-pip-version-check --no-warn-script-location
In this way it is also possible to uninstall packages, for instance the viiaPackage. The command to do that is:
>>> "C:\Program Files\Diana 11.0\python\python.exe" -m pip uninstall viiapackage
To manually install a the latest version of the viiaPackage in DIANA, use:
>>> "C:\Program Files\Diana 11.0\python\python.exe" -m pip install --upgrade viiapackage --extra-index-url=https://corporateroot.pkgs.visualstudio.com/VIIA/_packaging/viiapackage@Release/pypi/simple/ --extra-index-url=https://corporateroot.pkgs.visualstudio.com/_packaging/haskoning-py/pypi/simple/ --disable-pip-version-check --no-warn-script-location
To manually install a specific version of the viiaPackage in DIANA use:
>>> "C:\Program Files\Diana 11.0\python\python.exe" -m pip install viiapackage==68.9.1 --extra-index-url=https://corporateroot.pkgs.visualstudio.com/VIIA/_packaging/viiapackage@Release/pypi/simple/ --extra-index-url=https://corporateroot.pkgs.visualstudio.com/_packaging/haskoning-py/pypi/simple/ --disable-pip-version-check --no-warn-script-location